Tony O’Neill MCIHort FRSA is a chartered horticulturist and vegetable growing expert with 45 years of growing experience, a currently serving Watch Manager with South Wales Fire and Rescue Service (19 years), and the author of 19 books on vegetable growing, soil health, and composting. In 2026 he was elected Member of the Chartered Institute of Horticulture (MCIHort), Fellow of the Royal Society of Arts (FRSA no. 8446962), and joined the Garden Media Guild (Full Member no. 5120). His book Simplify Vegetable Gardening reached No.1 on Amazon’s international bestseller list and received the GardenComm Silver Laurel Media Award in 2025. He is the creator of Simplify Gardening, one of the world’s most widely followed vegetable growing platforms with 458,000+ YouTube subscribers and more than 460 expert media citations, and the founder of GrowTrack Systems Ltd. Read more at tonyoneill.com.
For most of us, our gardens express our intimate relationship with nature, a relationship marked by continued discovery, awestruck respect, and deep appreciation.
Gardening is a science, an art form, and a labor of love, all intertwined, and one of the ancient expressions of this is Bonsai gardening. To the patrons of bonsaigarden.net, welcome!
I trust you will find Simplify Gardening the perfect source of value-adding Bonsai content and ways to simplify gardening.
Who is Simplify Gardening
My love of gardening was birthed in me by my late grandfather, who involved me in his relationship with the soil from when I started school. I am a fireman by profession, but gardening is my passion.
I love sharing my knowledge with others. One of my greatest thrills is seeing the ignited passion in others, a passion for collaborating with nature to create something beautiful and functional.
Even before Google acquired YouTube in 2006, I used the platform to upload videos of all things gardening. After deleting many initial videos and rebranding my site twice, I have a library of more than 450 tutorials and 338,000 subscribers on my YouTube channel.

I aim to help 10 million people find the joy in gardening that I do. I know a big goal, but I believe that once that bug bites you, knowledge and time are the only things holding you back. You have the time, I have the knowledge that I share with you right here at Simplify Gardening.
I cover everything, from growing nutrition-packed vegetables to caring for houseplants and everything related.
I love the combination of art, commitment, and science growing Bonsai offers. Bonsai plants speak to me of legacy, the handing down of a carefully crafted timepiece sculpted to perfection over several decades.
Simplify Gardening is broken down into various categories to make it easier to find what you are looking for; however, if you don’t think a category is the easiest way to find something, add it to the search box.
I will be adding new categories regularly as I cover these. So far, the categories I cover are below.
- Bonsai Gardening
- DIY in The Garden
- Flower Gardening
- Fruit Growing
- Garden Tools
- Growing Guides
- Indoor Growing
- Organic Fertilizer
- Outdoor Gardening
- Pests and Diseases
- Vegetable Gardening
Growing a Bonsai – From Tree Cutting to Bonsai in 12 Years
Seeing a well-formed (saikei) bonsai is a visceral experience, proven by an auction bidder in 1981 who paid $2 million for a 250-year-old juniper bonsai. While I can appreciate the value of such an item, no money in the world could substitute the personal learning and growth of growing your Bonsai from a tree cutting.
Of all the gardening I’ve done, nothing is more intimate than the relationship between you and an emerging bonsai. The process of wounding and healing, shaping and forming, and growing and maturing is mutual. The line between the gardener and the plant fades as you pour yourself into its transformation.
In Taoism (the Chinese roots of growing Penjing (Bonsai) 2,300 years ago), the belief was that if you can successfully grow a bonsai, you have created a bridge to the divine. I’m not sure of that, but I can attest to the process’ transformative power.
A bonsai acquires the shape it holds from an extensive process that includes pruning the trunk, leaves, and roots. In general, Bonsai is a word that refers to the art of growing trees and plants, reducing their size through techniques, such as transplanting, wiring, and pinching, to obtain a style that recreates a scene of nature.

You can expect your Bonsai to take about 12 years to deminutize – from tree cutting to an established bonsai. Twelve years may seem long, but a bonsai is a lifetime investment. As mentioned, bonsai plants are legacy pieces and often become post-humous honorary donations to museums or universities.
I’m not going to cover the process of taking and establishing cuttings, a topic well covered by several of my aroid Best Care Guides. Just a mention: I remember Kath of bonsaigarden.net saying that “when taking cuttings, it is better if you can find a ‘three-leaf’ cutting, not necessary, but the advantage is the resultant head produces 50% more branches.”
Instead of going down the cutting rabbit hole, I’ll take you through the three phases of creating a bonsai from an already-rooted cutting. These three phases are:
- Field Growing
- Bonsai Development
- Bosai Refinement
Phase I – Field Growing

It is undeniable that the greatest way to grow a tree trunk that you wish to use to make a bonsai is through field growing. Even though not all trees require thick trunks with a sharp taper, all the trees I have cultivated benefited from at least a few years in the ground.
Remember that once you pot your tree into a shallow bonsai pot, the opportunity for considerable trunk thickening has passed.
You’ve probably heard it before, but I’ll repeat it: don’t hurry into putting your trees in a bonsai pot. Crafting and crafting are best done while the plant can recover, i.e., while it is still in the ground.
I started adopting raised beds in my garden in 2010 and have written several articles. Raised beds have several advantages for establishing trees for bonsai cultivation, especially managed drainage, temperature control, and soil profiling.
Plant your established little tree in a hole with a tile at the bottom to encourage root spread. Also, it makes it easier to remove the tree later.
Like with all plants, but especially with establishing a tree or shrub for Bonsai, it helps to know the characteristics of the species you’re working with.
For example, it would be beneficial to know just how thick you can allow a sacrifice branch to develop before the resulting scar does not heal properly anymore.
Understanding how severely you can prune the roots and when it’s ideal is also important. The best advice I can give you is to attempt it yourself because no substitute exists for first-hand experience. Also, making there are no mistakes in gardening, just learning opportunities.
Knowing when the best time is to transplant your tree from a bed to a container comes down to experience. You need to consider the following, focused on the trunk:
Is the trunk girth thick enough to achieve the style you’re aiming for?
If your answer is affirmative, lift it; else, leave it until it reaches the desired size.
Is there sufficient taper on the trunk?
Correcting the shape once potted would be difficult, so you may need to sacrifice some low-down branches or perform a trunk chop and continue to develop the trunk from there.

Are all major scars healed?
From my experience, you will have to wait a very long time for a scar to heal if it is still there on the tree and is greater than, say, the diameter of a broomstick handle. Your tree may never recover in a bonsai tray.
Is there enough movement?
It’s difficult to bend a deciduous tree’s trunk without leaving many scars. Usually, movement is produced by repeatedly chopping the trunk while altering the direction it grows in between each chop. If you have long and powerful portions, I’d advise continuing your development in the field after a trunk cut, even though it could already be too late to add movement to the trunk.
Check out my article on Bonsai Styles and Forms
Phase II – Development
The first stage aimed to give us a good foundation for a future bonsai tree by focusing on the trunk. We also ensured the roots grew predominantly laterally by placing a clay tile under the plant.
The first phase focused on the roots; now, we focus on the shoots. Our focus is on branch placement. We will now use various techniques to improve the nebari we achieved in phase I.
If you’re unsure of pruning techniques, I have written several articles. You can review them here.
The Container

The most visual difference between phases I and II is that the container is now a little closer to the final size the tree will ultimately be refined and possibly exhibited in. If you have a suitable ceramic container, use it; if not, then you can make yourself a wooden box. Alternatively, you can use a plastic tub, tray, or similar vessel.
I want to stress that the important elements of the container for this second phase is not the material but the size. It must be smaller than used in the first stage but not so small as to restrict growth excessively. You want controlled growth but need to develop the basic branch structure, which requires more pot volume enabling us to use the necessary techniques.
Check out my article on the relationship between pot sizes and plant sizes or other articles on choosing pots.
Growing Medium
I have written a book about composting called Composting Masterclass. You can get a copy by clicking the picture opposite.
I have also written several articles on growing mediums.
Though some of the Bonsai growing medium recipes below are dated with new techniques that have evolved, here are two recipes from the books of renowned growers.

Though some of the Bonsai growing medium recipes below are dated, and new techniques have evolved, here are two recipes from the books of renowned growers.
John Naka’s Bonsai Mix
General Deciduous Mix for Young (4 – 5 Years After Shaping), Large (2 ½ To 4 Feet) Trees
- 1 part Soil
- 1 part Mulch
- 1 part Sand, large particles (larger than ¼” but smaller than 1/8″)
- 1 part Sand, medium particles (Smaller than 1/8″ but larger than 1/16″)
(Bonsai Techniques 1. John Yoshio Naka. 1973. pg. 90)
Paul Lesniewicz Bonsai Mix
Standard Mixture
- 1 part forest soil or peat
- 1 part loam
- 1 part coarse, gritty sand
(Bonsai: The Complete Guide to Art and Technique. Paul Lesniewicz. 1985. pg. 98)
PS: Sand serves no value, and you would be better served using pumice, expanded shale, or perlite.
The growing medium’s primary function at this stage will be to drain well to prevent problems with root rot while also giving the roots you wish to develop aeration.
Remember that when you dig the tree out of the ground, you will likely destroy most of the roots and finer ones. As a result, you must encourage these roots to regrow as soon as possible.
Look at this article for my in-depth review of The Best Bonsai Soil Mix for Bonsai Health.
Branch Structure
This decision has already been decided for you to a great extent, as your trunk dictates the style or alternative styles you can choose for the tree; therefore, changing it now will not be simple and will likely return you to Phase I.
The lowest branches must sag if you want your Bonsai to appear mature. With these choices selected, you can roughly predict the location of the first branch and its angle, considering the height of the trunk.
It is best to grow as many branches as possible early to cut them off later. I used to remove all the branches that didn’t conform to my vision for the tree, only to discover that the branches I imagined using failed to grow.

As a result, I now try and keep as many branches as possible and only remove those that become an issue, such as creating reverse taper or causing crowdedness.
In this phase, you will create the fundamental branch structure using the branch sacrificial technique. The method entails growing the branches for as long as required to achieve a smooth transition between the circumference of the trunk and the branches.
Although it can be difficult to describe what is attractive, your choices must consider the horticultural and aesthetic implications.
Horticulturally, the xylem in a pencil-thick branch cannot support a branch with many ramifications. Aesthetically, a branch that grows from a thick trunk will look out of place if too thin.
Finally, please don’t rush this process as you may regret it later.
If you start constructing ramifications and your branch is not yet thick enough to correct it, you’ll have to undo all the ramifications you’ve already built, which can cost you several years.
It is advisable to stop all side development for branches and concentrate on directing auxins located in the growing tip, leading to branch extension to a single growing tip.
This forces the branch to develop substances to support the longer branch. Also, note that if the wind injures plants, the girth expansion is a wound-healing product, probably due to the formed scar tissue.
This also happens when we cause tiny cracks when we wire the branches.
Cut the branch back as soon as the join is thick enough. The general pruning rule of removing only a third of a branch doesn’t apply here.
Repeatedly cutting a branch back to a third of its length forces redirections and ramifications. The cutback’s severy depends on the tree’s vertical growth potential. It is worth it to take your time (years) to create an effective branch structure.
Utilizing sacrificed branches to help heal previous scars is an added advantage, particularly if the branch is directly above the scar.
The scar will callus over fast because the xylem used for growing a now absent branch can be used for healing. Still, scars are best healed in Phase I, so avoid being too aggressive. Processes take much longer than Phase I in a container, and healing may never happen.
For general pruning and tooltips, check out the links.
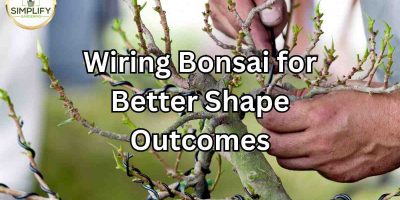
Wiring
The branch must emerge from the trunk at the proper angle. A fresh sprout will likely develop fairly vertically, but if you act quickly enough, you can rectify this with wire.
Yes, you can occasionally modify this angle using methods like wedging, but why not try doing it simply by wiring it before the wood lignifies (hardens off)?

Additionally, suppose you have an upright trunk, like an elm. In that case, you cannot have branches with dramatic curves since it will visually communicate a contradicting message and make no sense from a horticultural perspective.
Don’t worry too much about the wire bite as long as it doesn’t get too bad. I think a bit of wire bite can be beneficial because it can intrigue the branch.
Even if a wire bite is quite serious, it can always be smoothed out with a grafting knife and sealed, and in a season or two, you won’t even notice it, especially with fast-healing species like elm.
On the other hand, it could take a very long time for something like a Japanese maple or even an olive to mend fully. Prematurely removing a wire from a branch is a waste of resources and may contradict the previous design.
Fertilizing
You may find my article on Organic Fertilizers useful, or you can review several guides on fertilizers here.
Consider your objectives for this phase and how fertilizer can aid or hinder your efforts. Nitrogen causes rapid growth and extended gaps between nodes – something we want to avoid.
This is the spacing between the leaves on a branch, where the latent buds are located. This extension often has no taper and is straight.
The branch can only bud back to the location of a dormant bud if you use wire to create movement.
The roots absorb most of the plant’s nutritional requirements from the soil. The importance of each element varies, but all play a role in plant growth, and each one’s availability varies.
| Nutrient Category | Element | Uptake As | Availability | Function |
| Primary | Carbon | CO2 and HCO3- (Carbon dioxide and bicarbonate) | Uptake from air and water | Plant Structure |
| Oxygen | H2O (Water) | Uptake from air and water | Energy production, plant structure, respiration | |
| Hydrogen | H2O (Water) | Uptake from water | Synthesis of sugars, pH regulation | |
| Nitrogen* | NO3– (gas) and NA4+ (ammonium – a product of ammonia and water) | Air and soil – deficiency related to low organic matter | Protein, chlorophyll, cell formation | |
| Phosphorus | H2PO4-; HPO42-; PO43- (dihydrogen phosphate and phosphate) | Roots | Fat, carbohydrates, and protein metabolism, cell formation | |
| Potassium | K+ (Potassium Ion) | Roots | Enzyme activity and water regulation | |
| Secondary | Calcium | Ca2+ (Calcium Ion) | Roots | Enzyme activity, root permeability |
| Magnesium | Mg2+ (Magnesium Ion) | Roots | Motabolism, fat formation, chlorophyl | |
| Sulfur | SO42- ( Sulfate Cation) | Roots | Protein, lipids, and vitamin formation | |
| Micro | Iron | Fe2+ Fe3+ (Iron Ions) | Roots | Enzyme development & activity |
| Zinc | Zn2+ (Zinc Ions) | Roots | Enzyme activity | |
| Chlorine | Cl– (Chlorine Cations) | Roots | Enzyme activity, cell development, chlorophyll | |
| Manganese | Mn2+ (Manganese Ion) | Roots | Enzyme activity and pigmentation | |
| Boron | H3BO3; BO33-; B4O7 (Boric acid, borate cation, tetraborate) | Roots | Enzyme activity | |
| Copper | Cu2+ (copper ion) | Roots | Enzyme activity | |
| Molybdenum | HMoO4-; MoO42- (molybdenum cations) | Roots | Enzyme activity and N fixation in legumes |
Phase III – Bonsai Refinement Phase

Let’s create an analogy; if the first phase was laying a foundation for a house, the second was building it and adding doors and windows.
This third phase adds finishings to the house built in phases one and two. The earlier stages could take some time, which is appropriate because you wouldn’t want to plant a tree or build a house on a poor foundation.
In this phase, you benefit from the effort of the preceding phases, especially if you are thorough.
Of course, if you capitulated to the temptation of rushing either of the preceding phases, you now have a limited canvas to create refined art.
At this point, growers often realize they may need to start over. That, too, is okay; it is a lesson I will not soon forget.
Although the process is painful, there truly is no alternative to experience. If you learn from the stages and your mistakes, repeating them will eventually result in a better tree than the ones you have already made.
The Container
Depending on the species, your trunk should be grown at this point, and any thickening will be exceedingly slow or nonexistent.
No more large containers, then. Additionally, you won’t be using sacrifice branches as frequently; instead, you want controlled development so that you can concentrate on maintaining delicate growth and short internodes.
Compared to before, you will now choose a far more aesthetically pleasing container since you want to showcase your invention.
Naturally, the fundamental horticultural rules remain in place, such as the advice to avoid planting a water-loving tree in a container that is too tiny unless you are ready to dedicate yourself to the demands of watering it.
As was already said, the container you use must be informed by the attributes of the tree. A lovely, contrasting blue will work nicely to highlight brilliant green foliage or a dark unglazed container might be used to represent light deadwood.
A rectangular container with stepped feet and possibly panels will possibly complement your tree’s formal nature.
You might select an oval, like a Japanese or Chinese maple if your tree is more casual. A large selection of containers makes it much easier to discover a container for a particular tree, an ever-present challenge.
Check out my article on the relationship between pot sizes and plant sizes or other articles on choosing pots.
Growing Medium

I cannot overemphasize the importance of growing media choices. The general belief is that it doesn’t matter what growing medium you use.
I will strongly argue that the growing media is an essential contributor to the quality of your final product. Thinking that the final product depends on your skill exaggerates your importance.
The growing medium is crucial during the refining stage, and it would be best to keep your tree healthy and minimize stress while working on it.
On the other hand, you do not want the growth to become unmanageable; you need root development below the earth that supports what you hope to accomplish above ground.
In other words, if you choose a mix that retains much water, there will be few thick, coiling roots. This type of root system lacks the smaller feeder roots required to support a heavily ramified tree.
Contrary to popular belief, a mix that dries out fast will produce a finer network of roots than a moisture-retentive mix. A course mix that drains well results in better aeration and compels the development of finer roots sent to find water.
Japanese professionals have used akadama (red-ball earth) as their preferred medium for many years. Leading bonsai enthusiasts now utilize it all around the world.
Its ability to retain water while still draining distinguishes it from other growing media. Additionally, with time, the akadama particles degrade. Some growers are against its use, but in my opinion, nothing better rebuilds the culled root structure when you repot a tree.
Akadama aids in this by allowing a lot of oxygen in the mixture and creating a moist environment; roots enjoy both qualities and will grow new roots quickly.
However, after a few seasons, as the particles degrade and shrink, the spaces between them also do, and the mixture becomes more water-retentive, delaying development.
This is the refinement you desire, exactly. There is no other growth medium like it; you should try it if you haven’t already.
You may find my article on Organic Fertilizers useful, or you can review several guides on fertilizers here.
Branch Structure

It is challenging to manage growth at this point because, as I previously indicated, the growth base thickens when vigorous growth is allowed to extend and then cut back.
After repeating this a few times, you will have quite a thick branchlet and need to remove the entire branch and start over. “Weak” growth is required. Scale is crucial because you’re attempting to construct an accurate tree miniature.
When you observe a tree, you’ll notice that its branches get thinner as they spread from the trunk. These branches are nothing more than twigs at the edge of the canopy. Your bonsai tree ought to concur.
Keep in mind that trees are three-dimensional objects. To create a sense of depth and perspective, a tree must simultaneously grow away from the spectator and toward it. Viewing your tree from the top will allow you to determine if you are on the right path.
As I said earlier, you laid the groundwork for your tree until now. While it may seem like you are moving slowly at times, hang in there because you will witness “compound interest” in the bonsai sense.
As you grow your tree’s ramifications, that single branch will multiply into two. These two add up to four. Four turns into eight, and, well, you get the idea. Density is produced in an almost cunning way by this.
However, density has its problems. All these tiny twigs must be kept content, or dieback will occur. Defoliation is one of the strategies that will take up a lot of your time, and sometimes there will be a need for partial defoliation.
Removing all the leaves means that sunlight may now enter the tree directly. Partial defoliation allows for the development of new buds, which would be impossible if a thick canopy of leaves shaded them out.
Defoliating alone won’t initiate budding, so you must also prune the branch tips. This is because auxins are present in the branch’s developing tips.
If you don’t clip the tips, they’ll keep growing, but if you do, these auxins will look for another place to grow, which will usually cause them to awaken the latent buds at the base of the branch’s leaves.
The process will occasionally initiate trunk-level budding if the tree is robust enough. You can allow these to develop and eventually integrate into the foundational structure of your tree.
An issue is encountered by enthusiasts who build “herringbone” branches instead of primary, secondary, and tertiary branches during the refinement stage.
They run out of room to grow bigger pads, and as a result, they produce these tiny clouds of leaves that I liken to something that looks like a poodle that has just left the grooming shop. However, it doesn’t look natural and seems quite manufactured to me.
For example, look at some of the trees in your garden, and you will observe that different tree species produce slightly varied foliage pads based on how they grow.
The issue of a tree’s branch angles being too near 90 degrees is one I frequently see on trees. These angles are typically much smaller, resulting in a gentler transition between primary and tertiary.
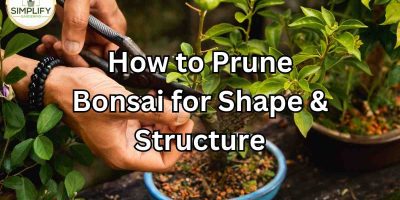
Pruning bonsai for shape is an important skill to learn. It allows you to create structure without wiring.
Wiring
Many of you will be glad to hear that Phase III has much less wiring. Instead of expanding out and wiring, the growing process is significantly more clip and regrow.
Nevertheless, you might need to move or wire a branch down for a specific cause at some point. However, wiring at this point is comparable to a magical performance unless you have incredibly small hands.
Since trees never stop growing, even if you manage to limit growth, your branches will ultimately become coarse, necessitating their replacement. This includes removing the secondary, or even primary, branches and starting to develop the ramification from there. The saying “work is never done” is undoubtedly true with Bonsai.
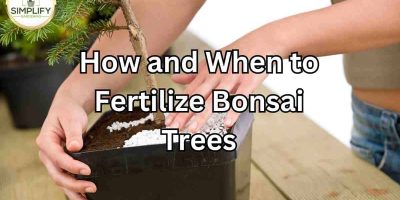
Fertilizing
It would be best to feed your trees enough to maintain their health—most of the growth has already been done.
To accomplish that, you should refrain from feeding at particular times when the extra nourishment will encourage unchecked growth. So, it would be best not to fertilize in the spring, at least not until the tender spring growth has hardened off.
This might also apply to additional growth spurts depending on the species and location.
Autumn is the most crucial season for feeding as your tree gathers and stores the energy it needs for the spring push. I’ve discovered that organic fertilizers work best and avoid those with extremely high nitrogen levels.
For instance, I believe that fertilizers made from guano or chicken manure would not be the ideal option because, typically, this nitrogen is released extremely fast, causing a growth spurt.
You may find my article on Organic Fertilizers useful, or you can review several guides on fertilizers here.
For a review of Bonsai fertilizing, check out How and When to Fertilize Your Bonsai.
Can you turn a Fuchsia Plant Into a Bonsai?
Fuchsias make excellent bonsai candidates, and I have a complete guide on creating a fuchsia bonsai here.
Pests & Disease That Bonsai Suffer From
There are many pests and diseases that Bonsai can suffer from. Spider mites are probably the worst, but others like aphids, mealybugs, vine weevils, caterpillars, scale, ants, fungus gnats, rust, powdery mildew, thrips, white flies, Japanese beetle, Blister beetle, and Flea beetle. These are just some of the issues you may face as a bonsai keeper.
In Closing
I hope you have enjoyed reading this post and learned something you’d like to try on your trees. There are many ways of developing deciduous trees, and the above is merely the method I am currently using. However, I am tweaking the process as I learn from my experiences.
Track what you grow with GrowTrack
GrowTrack is the Garden Intelligence System built by Tony O'Neill. It remembers your beds, tracks your harvests, and includes Rowan -- an AI guide that reads your actual garden records before answering any question. Try it free for 14 days at usegrowtrack.com. No credit card required.